
https://luftdev.itch.io/platformer-3d 3D Character Control Demo (2021)
In this project I implemented 3D character movement, camera controls, and a basic targeting system. My objective was to replicate the behavior and feel of specific hack-n-slash games as closely as I could. I wanted to architect and
build these systems myself to get a better understanding of how they work. The CharacterI started this project in Godot, and I started work on character with a plain capsule (and soon a rudimentary character model). I kept the assets and visuals as basic as possible, because if the results aren't satisfying with basic shapes, then it wouldn't be satisfying with anything prettier. TurningThe first detail of character movement I wanted to recreate was the way some characters physically turn on a radius while running. This makes the character's movement more believable and it gives the controls a sense of weight. I dedicated all running and turning code into a Movement node on the character.
My initial implementation of turning was naive, where I simply lerped the character's current direction with the desired direction. This felt "spongy" in a way, because the turn speed was not linear and the character indefinitely
"approached" the desired direction. Increasing the lerp weight helped reduce the spongy feeling, but it didn't solve the problem. As a side effect of using this lerping method, fine turns took about just as much time as more dramatic
turns did, which felt very unnatural.
I re-implemented the turning method to use angular velocity and angular acceleration instead. The math
was a little more involved, but the improvement was noticeable. Finally the controls began to feel like that of the games I'm modeling. Linear interpolation is usually a quick and easy tool, but it wasn't the right one for this
situation. Leaning
The next aspect of 3D character movement I wanted to replicate was leaning while running. I implemented this solely as a cosmetic detail and dedicated a
single node to this behavior. Some games appear to layer animations to achieve this effect (which looks much nicer in the
end), but I chose to rotate the character model for simplicity.
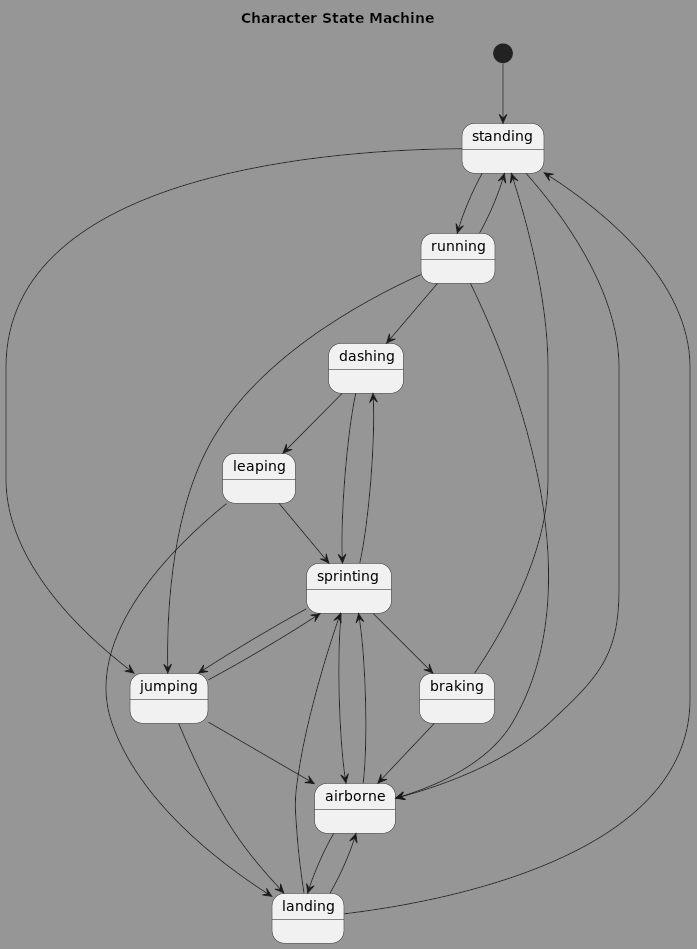
Character State MachineI divided the character's code into dry, reusable pieces with the use of a state machine. The states are responsible for defining very specific behaviors, and the state machine itself is only responsible for defining transitions. I found in my 2D project that this pattern is my favorite for this type of problem.
One of the payoffs of this approach is that there is a clear definition of what the character does and when. It's event-driven, so the state machine itself is almost entirely
a list of event handlers. Some of these states are inherently similar (running and sprinting for instance), so I chose to
inject some of the fundamental states into others, allowing common to be selectively borrowed. By taking this approach I was able to save myself from copying and pasting all over the place. This is a visualization of the resulting state machine. I used PlantUML to generate it, based on the transitions defined in my code. Frankly it isn't the easiest system to interpret visually, but it goes to show the state machine's ability to drive complex behavior.
AnimationI started this project with a plain capsule, but for things like character lean to feel good, and for states to distinguish themselves visually I needed art and animation. I quickly made a boxy character in Blender, rigged him up and animated him.
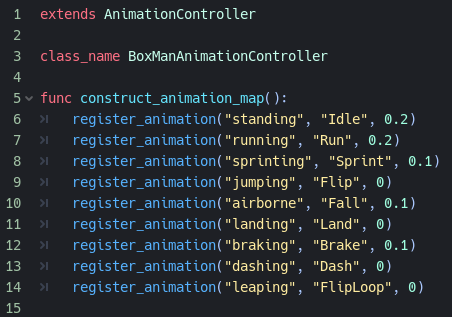
I built an animation controller node that is injected with and reacts to the state machine. This way the character's state determines the animation, while the state code itself remains agnostic. I didn't need any complex animations, so an animation per state was sufficient.
This state-driven animation controller simplified the process of adding new animations, only requiring an animation name, state name, and a blend time for each new animation. After building the generic animation controller I made a
child class for my blocky character, and I only had to overwrite its animation mapping method.
The CameraThe camera systems in these games can have complex behavior, so building a good camera was the next task. These types of games can vary quite a bit, so I picked the modern NieR games to imitate specifically. In these games the character tends to lead the camera, giving attention to the wide environment and whatever the player may be fighting. This is especially true while locked on to large-scale bosses and evading attacks. The camera smoothing tends to be more dramatic than what I've observed in games like Devil May Cry or Monster Hunter, but the character is almost always perfectly kept in frame.
I started by creating the rig for this camera, which is just an empty object with a spring arm attached to it. This structure can move independently of the character, and the spring arm keeps the camera out of geometry. With a basic
structure built I was ready to move onto behavior.
Controlling The Camera ManuallyThis project was built with controller input in mind, so the camera is moved with the right control stick. This simply rotates the spring arm on the rig. Automatic Panning
If the player moves left or right for long enough without touching the camera controls, then the camera will begin to pan automatically. This meant that the camera rig needed to change behavior dynamically, and I chose to implement
another state machine to make that job easier. With it I separated my strategies for moving the camera into very
short scripts. I moved the existing behavior into "idle" and "manual" states before proceeding.
The first new state is the "strafing" state, which is when the character is running left or right and the camera is left alone. This state is executed for a short amount of time before the state machine transitions to the "automatic"
state. In this second state the camera simply pans left or right, depending on the direction the player is moving. When the player moves the right stick or if the character runs forward, then manual control resumes. Targeting Objects With The Camera
The level I built had some cubes to play with, which up to this point were simply rigid bodies. Now I wanted to give the player the ability to target these cubes while kicking them around. I made a custom node and dropped it onto these
cubes, so that they can be targeted, then built a simple proximity-based targeting system on the character. Pressing the left trigger engages and disengages targeting. While targeting something, I put a reticle on the screen over the
target. If the character is too far away from the target, then targeting disengages.
Upon receiving a reference to a target through events, the camera rig changes to the "targeting" state. This state actively pans the camera to keep both the character and the target in frame. In NieR: Automata when standing
still it appears that the camera simply lerps its bearing to face directly at the target, while sitting on the opposite side of the character. Surprisingly this keeps both in frame pretty effectively. I played around with this for hours
and was thrilled with the results. While targeting, the player is actually able to tilt and influence the camera with the stick. This isn't particularly useful in most situations, but I honored this by injecting the manual state into the targeting state, so that it can reuse some of that behavior. When the user disengages the target the camera rig transitions to the automatic state.
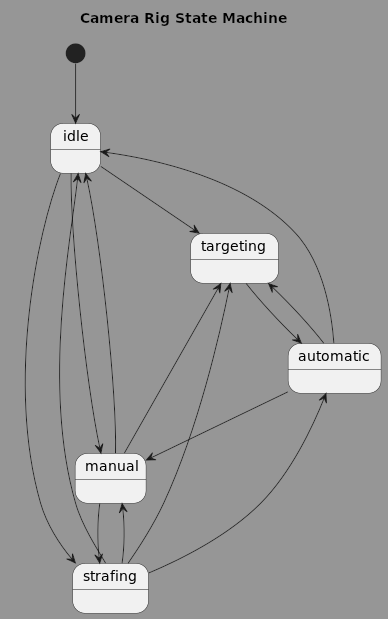
This state transition diagram portrays the camera's state machine.
Terrain Addon UsedHeightmap Addon by Zylann (MIT) For this demo I borrowed an existing heightmap addon, created by Zylann (linked above). |
TUXDB - LINUX GAMING AGGREGATE

NEWS TOP_PLAYED GAMES ITCH.IO CALENDAR CHAT WINE SteamDeck
STREAMERS CREATORS CROWDFUNDING DEALS WEBSITES ABOUT
PODCASTS REDDIT
STREAMERS CREATORS CROWDFUNDING DEALS WEBSITES ABOUT
PODCASTS REDDIT